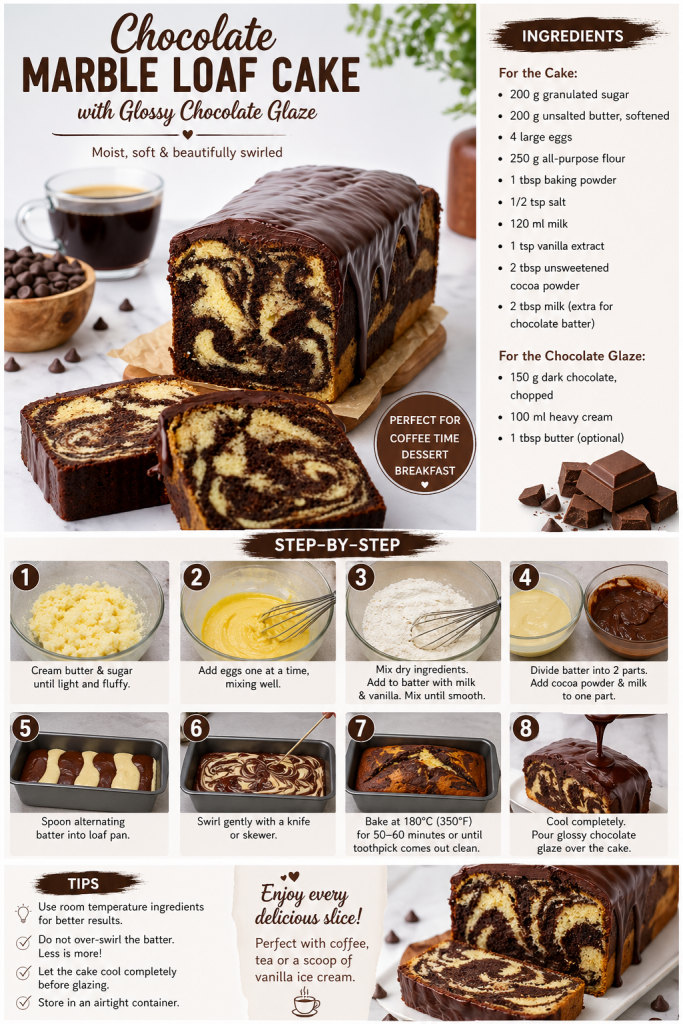
✨ Introduction
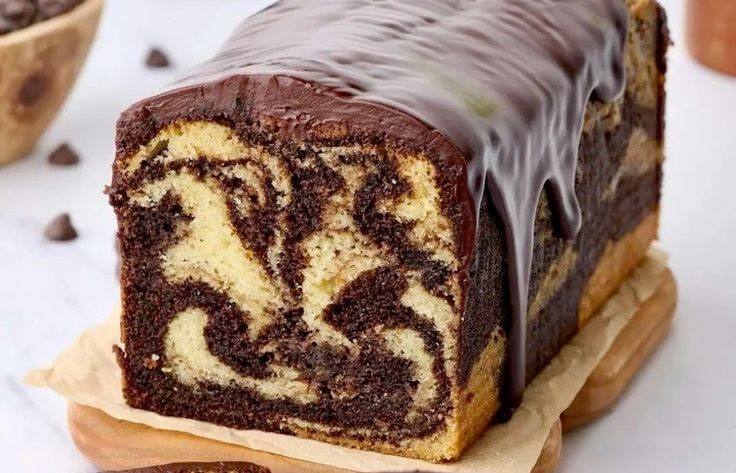
There’s something timeless and comforting about a beautifully swirled marble cake. This Chocolate Marble Loaf Cake combines the richness of chocolate with the light, buttery flavor of vanilla in a perfectly balanced dessert. Each slice reveals a stunning swirl pattern that looks impressive but is surprisingly easy to create at home.
Topped with a silky chocolate glaze that gently drips over the edges, this cake is ideal for breakfast, afternoon coffee, or dessert. Whether you’re baking for your family, guests, or your Pinterest audience, this loaf cake is guaranteed to stand out.
🧾 Ingredients
For the Cake:
- 200 g (1 cup) granulated sugar
- 200 g (1 cup) unsalted butter, softened
- 4 large eggs (room temperature)
- 250 g (2 cups) all-purpose flour
- 1 tablespoon baking powder
- 1/2 teaspoon salt
- 120 ml (1/2 cup) milk
- 1 teaspoon vanilla extract
- 2 tablespoons unsweetened cocoa powder
- 2 tablespoons milk (extra for chocolate batter)
For the Chocolate Glaze:
- 150 g (1 cup) dark chocolate, chopped
- 100 ml (1/2 cup) heavy cream
- 1 tablespoon butter (optional, for shine)
🥣 Equipment
- Loaf pan (20–22 cm / 8–9 inch)
- Mixing bowls
- Hand or stand mixer
- Spatula
- Toothpick or skewer (for swirling)
👩🍳 Instructions
Step 1: Prepare Your Oven and Pan
Preheat your oven to 180°C (350°F). Grease your loaf pan with butter and lightly dust with flour, or line it with parchment paper for easy removal.
Step 2: Cream Butter and Sugar
In a large bowl, beat the softened butter and sugar together using a mixer until the mixture becomes light, fluffy, and pale. This step is essential for creating a soft cake texture.
Step 3: Add Eggs
Add the eggs one at a time, mixing well after each addition. Make sure each egg is fully incorporated before adding the next. This helps maintain a smooth batter.
Step 4: Combine Dry Ingredients
In a separate bowl, whisk together:
- Flour
- Baking powder
- Salt
This ensures even distribution and prevents lumps.
Step 5: Mix Wet and Dry Ingredients
Gradually add the dry ingredients to the butter mixture, alternating with milk. Start and end with the flour mixture. Add the vanilla extract and mix until smooth. Do not overmix.
Step 6: Create the Chocolate Batter
Divide the batter into two equal parts.
In one portion, add:
- Cocoa powder
- 2 tablespoons milk
Mix until smooth and fully combined. Now you have a vanilla batter and a chocolate batter.
Step 7: Create the Marble Effect
Spoon alternating layers of vanilla and chocolate batter into the loaf pan.
Once all batter is added, use a knife or skewer to gently swirl through the batter. Avoid over-mixing—just a few swirls will create that beautiful marble pattern.
Step 8: Bake
Place the loaf pan in the oven and bake for 50–60 minutes, or until a toothpick inserted into the center comes out clean.
If the top browns too quickly, cover loosely with foil during the last 10–15 minutes.
Step 9: Cool the Cake
Remove the cake from the oven and let it cool in the pan for 10–15 minutes. Then transfer it to a wire rack to cool completely before adding the glaze.
🍫 Make the Chocolate Glaze
Step 10: Heat the Cream
In a small saucepan or microwave, heat the heavy cream until hot (but not boiling).
Step 11: Melt the Chocolate
Pour the hot cream over the chopped chocolate. Let it sit for 1–2 minutes, then stir until smooth and glossy. Add butter if you want extra shine.
Step 12: Glaze the Cake
Pour the glaze over the cooled cake, letting it drip naturally down the sides for that elegant finish. Allow the glaze to set slightly before slicing.
🍽️ Serving Suggestions
- Serve with a cup of coffee or tea
- Add a scoop of vanilla ice cream for dessert
- Sprinkle chopped nuts or chocolate chips on top for extra texture
💡 Tips for Perfect Marble Cake
✔ Use room temperature ingredients for better mixing
✔ Don’t over-swirl the batter—less is more
✔ Measure ingredients accurately for best results
✔ Let the cake cool completely before glazing
✔ Use high-quality chocolate for a richer taste
🔄 Variations
🍊 Orange Chocolate Marble Cake
Add orange zest to the vanilla batter for a citrus twist.
🌰 Nutty Version
Fold chopped walnuts or hazelnuts into the batter.
🍫 Extra Chocolate
Add chocolate chips to the chocolate batter for a richer flavor.
🧊 Storage
- Store at room temperature in an airtight container for up to 3 days
- Refrigerate for up to 1 week
- Freeze slices for up to 2 months
❤️ Final Thoughts
This Chocolate Marble Loaf Cake is the perfect combination of simplicity and elegance. With its soft texture, rich flavor, and eye-catching swirl, it’s a recipe you’ll come back to again and again.
Whether you’re baking for your family or creating content for Pinterest, this cake delivers both in taste and appearance. One slice is never enough!